Wednesday, February 29, 2012

Oil & Water Candles


Today, I made a candle using canola oil and water, and I think it came out really cute! 
See for yourself.


Here's the tutorial:

 (I went with a beach theme - you can use anything decorative that you like, as long as it's waterproof):

MATERIALS NEEDED:
  • Ample work space
  • A glass container. (I got mine at Michael's.)
  • Sand (Michael's)
  • Seashells (Michael's)
  • Starfish (Michael's)
  • Decorative glass bits (Target)
  • Sea glass (Dollar Store)
  • Thin, clear plastic (I used the plastic bubble from the packaging of a toy)
  • Wax-covered candle wicks (Michael's)
  • Scissors
  • A pencil (You can use the scissors for this if you're careful!)
  • Canola Oil (This will probably work with any cooking oil that you have)
  • Water
  • A lighter or matches


STEP 1
Cut your plastic into a small piece - this will be to hold your wick. 
(You will only need 1 piece per candle, I just have multiple pictured to show you how they look! 
Also, I will probably make some more candles, so this saves me a step later.)


STEP 2
 Use a pencil (scissors) to poke a hole in the plastic for the wick.

STEP 3
Cut the wick into small pieces - about an inch long.
(Again, you only need one, I just wanted to show you and save a step later!)

STEP 4
Insert the wick into the plastic. 
You only need a little bit poking out - this piece is going to float, so you want most of the wick on one side.

STEP 5
Arrange your decorative items in your container.

STEP 6
Pour your water in very slowly, and down one side, as to not disturb your decorative items.

STEP 7
This is just where I added the last decorative item - the little glass bits. I wanted them scattered, and I wanted there to be air bubbles in my candle since it's beach themed. Feel free to skip this if you do not want air bubbles.

Your container should now look something like this:


STEP 8
Pour your oil in very slowly, and off to one side. 
You do not want it to sink down onto your decorative items - it needs to float above the water.


You can see in this picture how I poured it in too fast - see the dark part of the sand?

You want a layer of oil evenly across the top of your container, like this:

STEP 9
Place your floating wick into the container. 
It will sink into the oil, but float on the surface of the water because of the thin plastic.

STEP 10
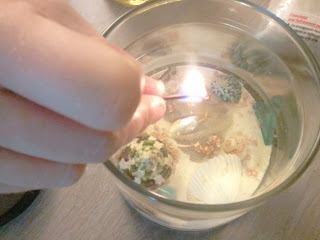
Set your candle wherever you'd like and light it! It will burn steadily until all of the oil is burned up - then it will put itself out.

VOILA! 


Tuesday, January 17, 2012

Good space-saving organizational idea for my yarn.

My BFF and I love to browse Pinterest to look for creative ideas.

Well, after searching and coming up empty, she thought, "What do I need to organize the most right now?" and it turned out to be her yarn.

OMG, ME TOO. 

I've recently gotten very into my crochet (even though I only make scarves and blankets and the occasional little toy) so I have TONS of yarn.

She had the idea to use a shoe organizer for hers. Her organizer is short, stout, and rotates. Works perfect for her closets.

Mine is just a cheap Wal*Mart one that is tall and thin. I have this closet in my bathroom that I never use for hanging clothes, and it fits perfect in there! Here's what I used:


And, here's my finished product! The only thing that didn't fit was the project I'm currently working on.

Wednesday, January 11, 2012

Magnetic Make-Up Board

I absolutely LOVE Pinterest!

I find lots of great ideas on there - some I modify, like this one:


It's a magnetic make-up board.

I bought a large print at a thrift store for $3. The picture doesn't matter - I just wanted a large wooden frame. You don't need the glass, either. (The glass broke as soon as I got home - good thing I didn't need it anyway!) It worked out well because I used the picture as a base, if you get just a frame, you will have to get a sheet of metal that will fit in the frame, or a sturdy piece of cardboard to attach the metal to.

So, I got a small sheet of metal - 12 x 18 - from Lowe's for around $4. I don't have a lot of makeup, so this was big enough for me. They had lots of different sizes - if you need something BIG, go to the kitchen area and get a backsplash. I don't remember where the smaller pieces were, I think electrical, but the employees there were really helpful and knew exactly what I was asking for. You're going to want a thin sheet so it's not too heavy in the frame. (Unless you're just going to have it sitting on your counter. I plan on hanging mine up on the wall.)

I flipped over the print, and duct-taped the metal sheet to the cardboard. Then, I covered the entire thing with sticky contact paper. The tape was about $4, and the contact paper was $2.

After I had the contact paper applied, I went around the edges with duct-tape again...my metal sheet was 12 x 18, but my cardboard was larger, so I used the tape like matting. (Also, it just double-y secured the metal to the cardboard- yay!) The original plan calls for fabric to cover the metal, but I found the tape and contact paper cheaper and easier to apply.

Then, I used Glue Dots and mini magnets for the backs of my makeup containers. I like these because they are strong, but still removeable. The original post I found said to use hot glue. I am accident-prone and did not want to burn myself!

What do you think?

Monday, January 9, 2012

Artwork for my bedroom

My bed.

2 placemats ($2 each at Big Lots), 8 Dollar Store picture frames (8 x 10 size, $1.50 each), 1 can of  Krylon Satin spray paint in Caramel Latte (Wal*Mart, less than $5)

Before - black

After - shiny antique gold

I got in too much of a hurry and completely missed one side!
I found this paint to be a little runny, but it works fine for the look I wanted to achieve.

The 2 placemats I chose
I got this kind because it was double-layered. Now, I can have 8 pictures instead of 4.

I cut right along the seams to separate each placemat into 2 peices of fabric.

See?

Then, I placed the glass from the frames onto the mat so I could pick which parts I wanted in the frames.
I used a silver Sharpie to mark because it was easier to see than pencil, and I don't mind if some silver shows.

Now that the lines are traced onto the fabric, you cut them out.
Make sure you have SHARP scissors - this fabric will start to fray and come apart if you don't.


The finished art pieces! Be careful putting the fabric in...I was going too fast and broke one of the frames a little bit...and then proceeded to Super-Glue my finger to the frame, which ripped off some of the paint. I left it because it'll be a great funny story to tell my kids one day.

Now all that's left is to decide how I'm going to hang them. I'm thinking either like this:

[] [] [] []
[] [] [] []

Or, like this:

[]
[] []
[]     []
[] []
[]